How to Install TeslaMate on BuyVM Slice for Just $2 Monthly Hosting Fee

This article will provide you with a detailed guide on how to install TeslaMate on your BuyVM Slice. We will go through each step of the process, starting from choosing the VM configuration that suits your needs, all the way to the installation and configuration of TeslaMate on your virtual machine.
If you're interested in setting up a self-hosted TeslaMate at an affordable cost of just $2 per month using a BuyVM Slice, then read on. We've got you covered with this step-by-step tutorial.
TeslaMate Features:
- Drive and charging reports
- Driving efficiency report
- Energy Consumption (net / gross)
- Charge Energy Added vs Energy Used
- Vampire Drain
- Projected 100% Range (Battery Degradation)
- Charging Stats
- Drive Stats
- History of Installed Updates
- See When Your Car Was Online or Asleep
- Lifetime Driving Map
- Visited Addresses
ALSO check the status of your car (inc. battery level) without waking your car up!
SLICE Selection
In this tutorial we will be using the SLICE 512 from BuyVM which includes 1 Core @ 3.50+ GHz (Fair Share CPU Usage Applies), 512 MB of Memory, 10 GB of SSD Storage and Unmetered Bandwidth.
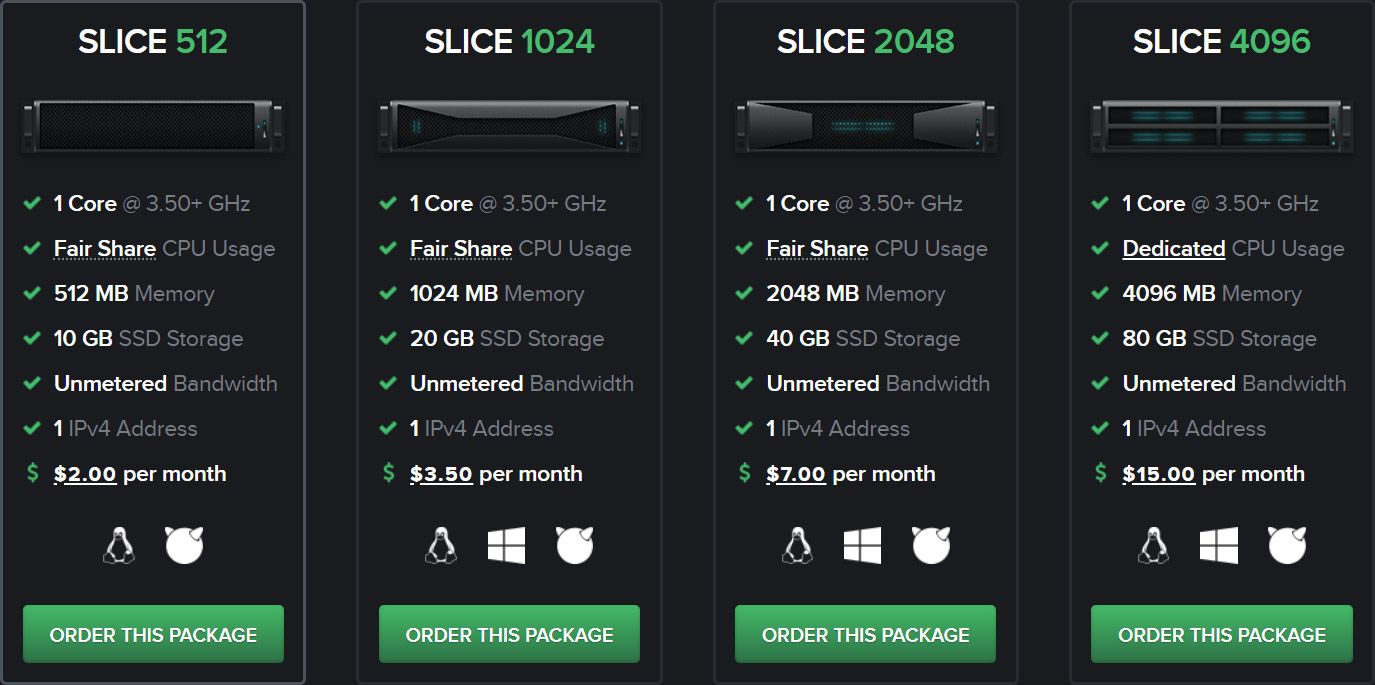
I recommend signing up for one of their new AMD Ryzen VPS in the Las Vegas Data Center to pop up again because they are higher performing, brand new and at no additional cost. They also offer cloud servers in New York and Luxembourg but with older Intel hardware.
I have used more memory before for hosting TeslaMate but found 512MB has been plenty adequate for running TeslaMate for one Model 3 and access for myself only.
Order Slice
- Select a location:
Order – Las Vegas
Order – New York
Order – Luxembourg - What would you like to do today? Click on 'Order Hosting'.
- Select the size of your slice and click on 'Order Now'.
- Enter your domain or subdomain into the order form.
Example: teslamate.tesla.com - They accept PayPal, stripe, along with a bunch of other options. Be sure that your account information matches your payment information or your purchase may get cancelled.
You should be setup within 1-3 hours during their regular business hours however new accounts can take up to 24-hours. Orders placed over the weekend are activated on Monday if they don't have anyone available.
Prerequisite
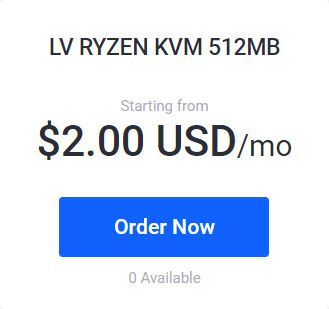
- LV RYZEN KVM 512MB or greater slice
- Two FQDN, for example teslamate.example.com and grafana.example.com
- PuTTY SSH Client
Log Into Stallion
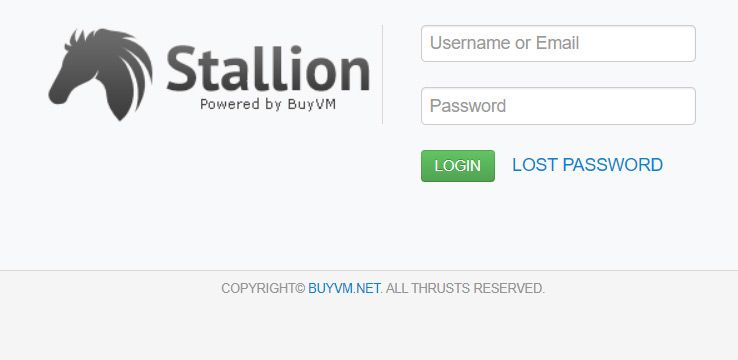
Stallion is the web interface that BuyVM developed for you to load your slice with an operating system, view status and manage all other tasks on your virtual server. You will find a link to Stallion at the top of the page when you login to the frantech client portal.
We will need to setup Docker manually because there isn't a pre-setup Docker but it's really no trouble at all to setup.
Select Image and Power On VM

Select 'Reinstall' from the tab menus. Now, click on 'Redhat Based (7)' from the list on the left. Click on 'Reinstall' next to 'CentOS 7.0 64bit' to bring up the install prompt. You will be asked to enter a password. This is for your root (or administration) password for your virtual server. Make sure to write this down in a safe place.
Click on the checkbox by: Yes, please wipe all data off yourhostname.com (IP ADDRESS)
Click 'Reinstall' when you're ready to proceed.
Manual Install Docker
Install the yum-utils package (which provides the yum-config-manager utility)
sudo yum install -y yum-utilsand set up the stable repository.
sudo yum-config-manager \
    --add-repo \
    https://download.docker.com/linux/centos/docker-ce.repo
Install the latest version of Docker Engine and containerd:
sudo yum install docker-ce docker-ce-cli containerd.ioStart Docker.
sudo systemctl start dockerVerify
sudo docker run hello-worldConfigure Docker to start on boot
sudo systemctl enable dockerTo disable this behavior, use disable instead:
sudo systemctl disable dockerSource: Docker
Setup - docker-compose.yml
version: '3'

services:
  teslamate:
    image: teslamate/teslamate:latest
    restart: always
    depends_on:
      - database
    environment:
      - DATABASE_USER=${TM_DB_USER}
      - DATABASE_PASS=${TM_DB_PASS}
      - DATABASE_NAME=${TM_DB_NAME}
      - DATABASE_HOST=database
      - MQTT_HOST=mosquitto
      - VIRTUAL_HOST=${FQDN_TM}
      - CHECK_ORIGIN=true
      - TZ={$TM_TZ}
    volumes:
      - ./import:/opt/app/import
    labels:
      - 'traefik.enable=true'
      - 'traefik.port=4000'
      - "traefik.http.middlewares.redirect.redirectscheme.scheme=https"
      - "traefik.http.middlewares.auth.basicauth.usersfile=/auth/.htpasswd"
      - "traefik.http.routers.teslamate-insecure.rule=Host(`${FQDN_TM}`)"
      - "traefik.http.routers.teslamate-insecure.middlewares=redirect"
      - "traefik.http.routers.teslamate.rule=Host(`${FQDN_TM}`)"
      - "traefik.http.routers.teslamate.middlewares=auth"
      - "traefik.http.routers.teslamate.entrypoints=websecure"
      - "traefik.http.routers.teslamate.tls.certresolver=tmhttpchallenge"

  database:
    image: postgres:12
    restart: always
    environment:
      - POSTGRES_USER=${TM_DB_USER}
      - POSTGRES_PASSWORD=${TM_DB_PASS}
      - POSTGRES_DB=${TM_DB_NAME}
    volumes:
      - teslamate-db:/var/lib/postgresql/data

  grafana:
    image: teslamate/grafana:latest
    restart: always
    environment:
      - DATABASE_USER=${TM_DB_USER}
      - DATABASE_PASS=${TM_DB_PASS}
      - DATABASE_NAME=${TM_DB_NAME}
      - DATABASE_HOST=database
      - GRAFANA_PASSWD=${GRAFANA_PW}
      - GF_SECURITY_ADMIN_USER=${GRAFANA_USER}
      - GF_SECURITY_ADMIN_PASSWORD=${GRAFANA_PW}
      - GF_AUTH_BASIC_ENABLED=true
      - GF_AUTH_ANONYMOUS_ENABLED=false
      - GF_SERVER_ROOT_URL=https://${FQDN_GRAFANA}
    volumes:
      - teslamate-grafana-data:/var/lib/grafana
    labels:
      - 'traefik.enable=true'
      - 'traefik.port=3000'
      - "traefik.http.middlewares.redirect.redirectscheme.scheme=https"
      - "traefik.http.routers.grafana-insecure.rule=Host(`${FQDN_GRAFANA}`)"
      - "traefik.http.routers.grafana-insecure.middlewares=redirect"
      - "traefik.http.routers.grafana.rule=Host(`${FQDN_GRAFANA}`)"
      - "traefik.http.routers.grafana.entrypoints=websecure"
      - "traefik.http.routers.grafana.tls.certresolver=tmhttpchallenge"

  mosquitto:
    image: eclipse-mosquitto:1.6
    restart: always
    ports:
      - 127.0.0.1:1883:1883
    volumes:
      - mosquitto-conf:/mosquitto/config
      - mosquitto-data:/mosquitto/data

  proxy:
    image: traefik:v2.1
    restart: always
    command:
      - "--global.sendAnonymousUsage=false"
      - "--providers.docker"
      - "--providers.docker.exposedByDefault=false"
      - "--entrypoints.web.address=:80"
      - "--entrypoints.websecure.address=:443"
      - "--certificatesresolvers.tmhttpchallenge.acme.httpchallenge=true"
      - "--certificatesresolvers.tmhttpchallenge.acme.httpchallenge.entrypoint=web"
      - "--certificatesresolvers.tmhttpchallenge.acme.email=${LETSENCRYPT_EMAIL}"
      - "--certificatesresolvers.tmhttpchallenge.acme.storage=/etc/acme/acme.json"
    ports:
      - 80:80
      - 443:443
    volumes:
      - ./.htpasswd:/auth/.htpasswd
      - ./acme/:/etc/acme/
      - /var/run/docker.sock:/var/run/docker.sock:ro

volumes:
    teslamate-db:
    teslamate-grafana-data:
    mosquitto-conf:
    mosquitto-data:
Setup - .env
TM_DB_USER=teslamate
TM_DB_PASS=secret
TM_DB_NAME=teslamate

GRAFANA_USER=admin
GRAFANA_PW=admin

FQDN_GRAFANA=grafana.example.com
FQDN_TM=teslamate.example.com

TM_TZ=Europe/Berlin

[email protected]
Setup - .htpasswd
As per the documentation for TeslaMate. I recommend you use this tool to create your .htpasswd file:
http://www.htaccesstools.com/htpasswd-generator/
Enter your desired username, password and select Bcrypt (Apache v2.4 onwards)
In the example below, I entered username and password for these fields:
Example:
my:$2y$10$as5PEnYaoGEx2ebCFjdK0e9PBshAsvzIeAKijwNgeMSC9oJkDNo2.Now copy and paste this information into your .htpasswd file.
vi .htpasswd (or your favorite text editor)Make sure you set up your password before you start the Teslamate with Docker!
docker-compose upNote: You may need to run this command twice to get it work.
DNS Setup
You will need to point teslamate.example.com + grafana.exampe.com (your subdomain) to the IP Address provided to you by BuyShared when you created your virtual server. This is done by contacting your web host or logging into your control panel to manage your DNS records and having these entries added.
Logging Into TeslaMate
- Open the web interface https://teslamate.example.com
Login with the details you entered into the .htpasswd file and then you will be prompted to log in with your Tesla Account. - Sign in with your Tesla account
- The Grafana dashboards are available at:https://grafana.example.com.
- Enter username:password:admin:admin first and you will be prompted to change the password on your first login.
Upgrade Available?
I always check out the release notes before upgrading.
docker-compose pull
[root@localhost ~]# docker-compose pull
Pulling database  ... done
Pulling teslamate ... done
Pulling grafana   ... done
Pulling mosquitto ... done
Pulling proxy     ... done
docker-compose up
[root@localhost ~]# docker-compose up
Recreating root_grafana_1 ...
Recreating root_database_1 ...
Recreating root_grafana_1  ... done
Recreating root_database_1 ... done
Recreating root_teslamate_1 ... done
....update messages
16:57:45.350 [info] Tzdata has updated the release from 2019c to 2020a
Your install is now upgraded and you can close out of the terminal. You can check the version by logging into your TeslaMate control panel.
Extra Protection
Let's start by disabling/uninstalling FirewallD:
sudo yum remove -y firewalldNow, let's install/activate IPTables.
sudo yum install -y iptables-services
sudo systemctl start iptables
Configure IPTables to start automatically at boot time.
sudo systemctl enable iptablesIPTables on CentOS 7 comes with a default set of rules, which you can view with the following command.
sudo iptables -L -nThe output will resemble:
Chain INPUT (policy ACCEPT)
target     prot opt source               destination
ACCEPT     all  --  0.0.0.0/0            0.0.0.0/0            state RELATED,ESTABLISHED
ACCEPT     icmp --  0.0.0.0/0            0.0.0.0/0
ACCEPT     all  --  0.0.0.0/0            0.0.0.0/0
ACCEPT     tcp  --  0.0.0.0/0            0.0.0.0/0            state NEW tcp dpt:22
REJECT     all  --  0.0.0.0/0            0.0.0.0/0            reject-with icmp-host-prohibited

Chain FORWARD (policy ACCEPT)
target     prot opt source               destination
REJECT     all  --  0.0.0.0/0            0.0.0.0/0            reject-with icmp-host-prohibited

Chain OUTPUT (policy ACCEPT)
target     prot opt source               destination
You can see that one of those rules allows SSH traffic, so your SSH session is safe.
Because those rules are runtime rules and will be lost on reboot, it's best to save them to a file using:
sudo /usr/libexec/iptables/iptables.init saveThat command will save the rules to the /etc/sysconfig/iptables file. You can edit the rules anytime by changing this file with your favorite text editor.
Next, Allow Additional Traffic Through the Firewall
Since you'll most likely be going to use your new server to host some websites at some point, you'll have to add new rules to the firewall to allow HTTP and HTTPS traffic. To accomplish that, open the IPTables file:
sudo nano /etc/sysconfig/iptablesJust after or before the SSH rule, add the rules for HTTP (port 80) and HTTPS (port 443) traffic, so that that portion of the file appears as shown in the code block below.
-A INPUT -p tcp -m state --state NEW -m tcp --dport 22 -j ACCEPT
-A INPUT -p tcp -m state --state NEW -m tcp --dport 80 -j ACCEPT
-A INPUT -p tcp -m state --state NEW -m tcp --dport 443 -j ACCEPT
-A INPUT -j REJECT --reject-with icmp-host-prohibited
Save and close the file, then reload IPTables.
sudo systemctl reload iptablesWith the above step completed, your CentOS 7 server should now be reasonably secure and be ready for use in production.
Other Security?
I want to preface this next idea by saying that you may run into issues because TeslaMate's SSL Cert requires the subdomains be pointed to the IP Address of your VPS, however if you hide it behind Cloudflare, this won't be the case and SSL will fail to renew on restarts of TeslaMate. So, I no longer recommend enabling CF until it's fully supported by the developer. I am going to leave it here for food for thought.

This is an extra step that isn't required to get going but might provide a little bit of extra security to your subdomains. Sign-up for Cloudflare! It's a free service that protects and speeds up your website.
- Click on 'DNS'.
- For your grafana (A Record):
Set Proxy status to Proxied. - Also, for your teslamate (A Record):
Set Proxy status to Proxied.
You will now notice that if you ping your subdomains they now have a lower ping and a different IP address because you are now routing your traffic through the Cloudflare Network and your IP address with BuyVM is now hidden during DNS requests.
I have tested enabling proxy mode for awhile now and haven't encountered any issues so far.
I hope you found this setup guide helpful. :)
Teslamate Install: Conclusion
In conclusion, setting up TeslaMate on your BuyVM Slice is a cost-effective and efficient way to monitor your Tesla vehicle's data. With our step-by-step guide, you can easily install and configure TeslaMate on your virtual machine without any hassle.
By following these instructions, you'll be able to enjoy the benefits of self-hosted TeslaMate while keeping your expenses to a minimum. We hope this article has been helpful in guiding you through the process, and we wish you the best of luck in your TeslaMate setup journey.